Collimation Instructions
For sight tubes on Newtonian Scopes
Overview
1. Mark Center of Primary Mirror
2. Position and Align Secondary Mirror
3. Align Primary Mirror
Mark Center of Primary Mirror
I recommend using a loose leaf reinforcement ring to mark center so the actual center will still be visible in later steps. Using a tape measure, mark center from two positions approximately 90 degrees apart with a felt tip pen. Then affix reinforcement ring around the center mark and wipe off felt tip marks. The ring will not interfere with star images as the secondary obscures this part of your mirror anyway.
Position and Align Secondary Mirror
The next step in proper collimation is to be sure the position of the secondary mirror centered in relation to the focuser and centered over the primary mirror.
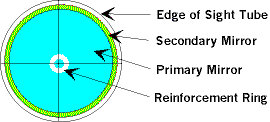
This can be accomplished with the sight tube in the focuser to a depth where the view of the secondary mirror is just inside the edge of the sight tube. Adjust the secondary so that it is centered in the sight tube and at the same time align the secondary so that the view of the primary mirror is centered in the secondary. It may be necessary to change the position of the sight tube to see all of the primary in the secondary. If all of the primary can not be seen with the sight tube you may need to use a film can in a 1 1/4" adapter ( Kodak's plastic cans work well and the center is marked in the lid, just cut off the bottom of the can and put a small hole in the lid's center ). The idea is to keep your line of vision centered as you make adjustments. When the secondary is properly aligned you will see what is in the detail below. At this point you may see two sets of crosshairs, this will be addressed in the next step.
Some scopes do not have much latitude for left-right or front-back movement of the secondary, so in some cases it may be necessary to shim the focuser to achieve proper alignment.
Align Primary Mirror
To align the primary you will use the three adjustment screws behind the primary ( if in doubt about which ones they are consult your instruction manual from the manufacturer ).
It is helpful to have a buddy assist you with this step, have them twist the screws while you observe the results. The idea is to align the crosshairs with their reflection from the primary.
If during this process the screw you need to twist "bottoms out" at either extreme, twist it back some to relieve any strain and twist the other two screws to achieve the same result.
When all is properly aligned you should see an image like the one below. If the crosshairs are aligned but the center is not in the center of the reinforcement ring then the secondary is not positioned correctly, usually front to back from the focuser. Some experimentation may be required to correct this.

Misaligned

Properly Aligned